Hello dear Amigurumi Knitting Lovers
Today we share a free amigurumi crochet pattern for you. As you know, we share new amigurumi free patterns every day. master crochets, amigurumi gazelles, amigurumi bears, amigurumi pola, amigurumi pandas, amigurumi penguins, amigurumi giraffes, amigurumi lama, amigurumi pigs, amigurumi rabbit, amigurumi clowns, amigurumi dolls, amigurumi unicorn, amigurumi elephants, amigurumi unicorn , amigurumi hippos, amigurumi monkeys, amigurumi cats, amigurumi dogs and more…
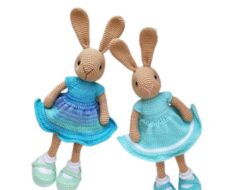
Today, the new daily crochet pattern Amigurumi Bunny Free Crochet Pattern I want to give you some information about this pattern;
Supplies:
- cotton yarn – I used DK (8 ply) weight Katia Pima Cotton (50 g / 105 m; 100 % cotton)
For making a unicolored bunny, you only need one skein of yarn. If you want to use two colors as in this example, you need less than a half of the skein of both colors.
- crochet hook 3.5 mm
- polyester fiberfill
- safety eyes (Ø 6 mm)
- some thread for stitching a nose
- some fabric or buttons for embellishing
Stitches and abbreviations
Slip stitch (sl st), chain (ch), single crochet (sc), repeat (rep), stitch(es) – st(s)
About the pattern:
- Work in continuous rounds.
- Use a stitch marker and place it in the first stitch of the round to mark the beginning of it.
- Leave each piece a long tail for sewing.
HEAD
1: Main color. Magic ring and 6 sc into it [6]
2: Work 2 sc in each st around [12]
3: (sc in next st, 2 sc in next st) rep 6 times [18]
4: (sc in each of next 2 sts, 2 sc in next st) rep 6 times [24]
5: (sc in each of next 3 sts, 2 sc in next st) rep 6 times [30]
6: (sc in each of next 4 sts, 2 sc in next st) rep 6 times [36]
7: (sc in each of next 5 sts, 2 sc in next st) rep 6 times [42]
8-17: Sc in each st around
Attach safety eyes between round 14 and 15. Count 8 holes from one eye to another.
18: (sc in each of next 5 sts, sc2tog) rep 6 times [36]
19: (sc in each of next 4 sts, sc2tog) rep 6 times [30]
20: (sc in each of next 3 sts, sc2tog) rep 6 times [24]
21: (sc in each of next 2 sts, sc2tog) rep 6 times [18]
Fill the head with fiberfill.
EAR (make 2)
1: Contrasting color. Magic ring and 6 sc into it [6]
2: Work 2 sc in each st around [12]
3: (sc in next st, 2 sc in next st) rep 6 times [18]
4-8: Sc in each st around
9: (sc in each of next 4 sts, sc2tog) rep 3 times [15]
10-12: Sc in each st around
13: (sc in each of next 3 sts, sc2tog) rep 3 times [12]
14-16: Sc in each st around
17: (sc in each of next 2 sts, sc2tog) rep 3 times [9]
18-20: Sc in each st around
BODY
1: Main color. Magic ring and 6 sc into it [6]
2: Work 2 sc in each st around [12]
3: (sc in next st, 2 sc in next st) rep 6 times [18]
4: (sc in each of next 2 sts, 2 sc in next st) rep 6 times [24]
5: (sc in each of next 3 sts, 2 sc in next st) rep 6 times [30]
6: (sc in each of next 4 sts, 2 sc in next st) rep 6 times [36]
7: (sc in each of next 5 sts, 2 sc in next st) rep 6 times [42]
8-11: Sc in each st around
12: (sc in each of next 5 sts, sc2tog) rep 6 times [36]
13: Sc in each st around
14: (sc in each of next 4 sts, sc2tog) rep 6 times [30]
15-16: Sc in each st around
17: (sc in each of next 3 sts, sc2tog) rep 6 times [24]
18-19: Sc in each st around
20: (sc in each of next 2 sts, sc2tog) rep 6 times [18]
Fill the body with fiberfill.
ARM (make 2)
1: Contrasting color. Magic ring and 6 sc into it [6]
2: Work 2 sc in each st around [12]
3: Sc in each st around
4-6: Main color. Sc in each st around
Fill the tip of the arm. Add some stuffing as the work progresses.
7: (sc in each of next 2 sts, sc2tog) rep 3 times [9]
8-11: Sc in each st around
12: (sc in next st, sc2tog) rep 3 times [6]
LEG (make 2)
1: Contrasting color. Magic ring and 6 sc into it [6]
2: Work 2 sc in each st around [12]
3: (sc in next st, 2 sc in next st) rep 6 times [18]
4: Sc in each st around
5-7: Main color. Sc in each st around
8: (sc in next st, sc2tog) rep 6 times [12]
9-13: Sc in each st around
Fill the leg with fiberfill.
14: (sc in each of next 2 sts, sc2tog) rep 3 times [9]
TAIL
1: Contrasting color. Magic ring and 6 sc into it [6]
2: Work 2 sc in each st around [12]
3-4: Sc in each st around
5: (sc in each of next 2 sts, sc2tog) rep 3 times [9]
Fill the tail.
Assembling the pieces
Start with the head – attach the ears and stitch the nose. Sew the head together with the body. Attach the arms, legs and tail. Embellish your bunny.